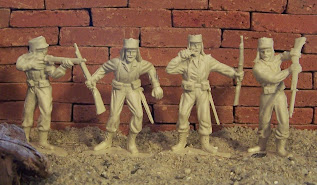
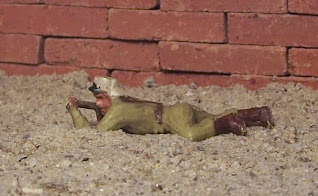
Their history can be considered in two parts: before and after 1940. Up to the summer of 1940, all their uniform and equipment was issued by the French government and it did not look that different from the what was worn during the First World War. After the armistice of 1940, many French managed to leave France and continued to fight on the Allies' side with uniforms and equipment provided by Britain and the US. Some of these troops however -the ones wearing British battledress- retained their Adrian helmets. French Moroccan troops were issued GI outfits. And then there were the Goumiers, African colonial troops who wore a striped coat on top of their American combat uniforms. All these troops were typically referred to as the Free French, to distinguish them from the French troops that served under the Vichy government that was established after the German occupation, or the French troops that served in the German Army. With all this diversity you would expect to see many different sets of figures out there, but unfortunately there are very few manufacturers of French Infantry troops as seen below.
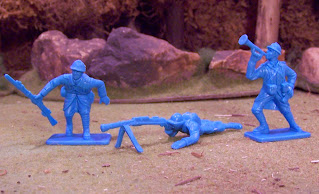
Marx French Infantry
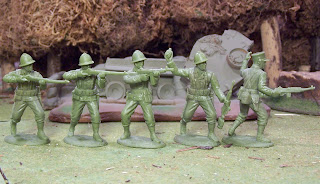
These are reissued figures based on the original Marx molds. They are wearing original French Infantry outfits. Sometimes when you see them listed online, they are referred to as Free French Infantry, but then they would be wearing British or American outfits, which is not the case with these figures. Faithful to the Marx sculpting style, these figures are slim yet well proportioned and with a nice level of detail.
Expeditionary Force Free French - Assault Section - Part I
I intentionally placed similar poses next to each other for ease of comparison. Subtle differences in the positioning of the legs and arms, and the weapons they carry. Note how the first and fourth men from the left, are based off the same body, and the arms make all the difference. The helmets also make a big difference from how they look as GIs, particularly the officer who is wearing a kepi in this case.
Expeditionary Force Free French - Assault Section - Part II
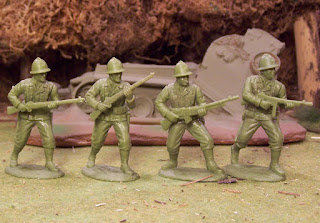
Three out of the four bodies are repeats, just with different arms. The new body is the one holding the bar, and smoking a cigar. Again, the arms make a substantial difference. Overall, they have managed to create a good range of figures using this interchangeable system of bodies and arms, without sacrificing much in terms of movement or creating awkward poses.
Expeditionary Force Free French - HQ Company - Part I
This set has the most diverse poses. They call it the HQ Company, but it also has a few heavy weapons. Note how the office is holding a set of binoculars. You will see that this is a theme that repeats itself quite a bit. Perhaps a bit too much. The bazooka team turned out pretty good. The sniper seems a little too exposed in my opinion.
Expeditionary Force Free French - HQ Company - Part II
Out of these guys, I really like the flame thrower and the radio man. The rest are good role players to fill the ranks. The bar man is a repeat of the earlier set.
Expeditionary Force Free French - Defense Section - Part I
This set has a few more kneeling guys with the same base body. I also put them next to each other for ease of comparison. The arms are some of the ones that we have already seen on the standing figures. The officer is similar to one of the earlier ones, but they have given him a pistol this time.
Expeditionary Force Free French - Defense Section - Part II
And we got a third bar man in this set. I could have used a few more sub MGs and fewer men walking with the rifle across their chest.
Expeditionary Force Free French - MG Section - Part I
A nice set of figures. The arms of the machine gun team attach in such a way that you can only put them in one position, which helps to make everything line up well. Other poses allow you to rotate the arms as much as you want.
Expeditionary Force Free French - MG Section - Part II
These are very similar to the previous ones, except for the officer and the rifleman.
The man standing with the rifle across his chest was supposed to be kneeling. The standing man was supposed to be another officer, but I swapped them so I could have a kneeling officer, as seen in the next picture.
Expeditionary Force Free French - MG Section - Part III
The only thing I don't like about the kneeling officer is that he seems to be pointing his binoculars downwards. So I guess I need to put him on high ground to make it look adequate.
Expeditionary Force Free French - Mortar Section - Part I
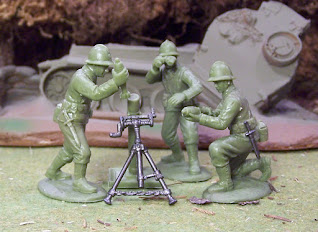
These three mortar teams are almost all the same. the only thing that varies is the officer.
Expeditionary Force Free French - Mortar Section - Part II
This one has a kepi and is holding a sub MG.
Expeditionary Force Free French - Mortar Section - Part III
This one is similar to the first one, but I raised the left arm to give it some variety.
Armies in Plastic French Infantry - Part 1
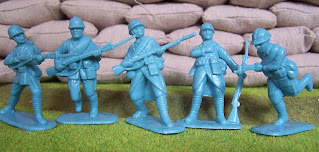
These AIP guys are actually World War I figures, however given the fact that the French uniform did not change that much during the inter-war period, except for the switch from blue to brown, these guys can pass for WWII French Infantry once they are painted. They are a bit bulkier than the Marx guys, but I think they will blend in well with them once painted.
Armies in Plastic French Infantry - Part 2
Note that some of these guys are wearing long coats, but that was also the case with WWII French troops up to the summer of 1940. The Adrian helmet is also the same as the one worn by the Marx figures.
DGN French Infantry - Part I
This is a nice set to have given the scarcity of French infantry figures. The man firing the bazooka is an interesting pose. I don't believe that this weapon existed at the early stages of the war, when the French troops still wore their original uniforms. Nonetheless, it is a welcome addition my the Frech army, as they would otherwise not have such a heavy weapon.
DGN French Infantry - Part II
As you can tell, the poses are also varied and decent. The scale of the weapons is my main concern with them. For instance, look at the size of the Bren gun's magazine, or the grenade that the man on the left is holding.
DGN French Infantry - Part III
The prone man firing the machine gun the worst case of how some of the weapons are out of proportion. In this case, the gun is almost as long as the man's body. Partly, this is also because his lower body is shorter than it should be. As far as the bugler, he seems more adequate for a WWI set, which makes me wonder if these guys were copied from a WWI set that I might not be aware of. The uniforms could certainly pass for WWI era dress style. BTW, note that I only have 11 poses. There might be a 12th pose out there, but these are all I got after buying two tubes.
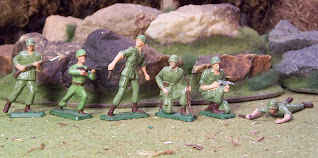
Starlux US or French Infantry Part I
These guys look like GIs to me, but knowing that French troops also wore US equipment, I don't know if they might have been made to represent French Infantry. Since they were made by Starlux a French firm selling to the French market, I would not be surprised if they are actually representing French soldiers. BTW, I am not sure why the second guy from the right was made of a multi-color plastic. I like the pose though.
Starlux US or French Infantry Part II
A few more GI looking guys. The uniform color is a bit different and some of them are wearing ties, but the helmet does look American issued. As you can see I only have a subset of the total poses as the man feeding the machine gun belt is missing the machine gunner to partner with.
Starlux US or French Infantry 45or 50 mm
These are slightly smaller figures than the 54mm guys. I don't know why they would have manufactured figures in two scales so close to each other. These guys show slightly more action than the other two sets. Would have been nice if they had been a bit bigger.
Starlux French Commandos - Part I
I have seen 10 poses of these, so I know there are at least that many of them. Unfortunately I only managed to get one of them in a batch of mixed figures.
Starlux French Commandos - Part II
Here are two more poses. Again, I found them in a large lot of mixed figures. They are a bit damaged, but it's still clear what the poses were meant to be. With the right parts and a bit of patience and skill I think they could be repaired.
Starlux French Foreign Legion - Part I
The FFL did see action in WWII, but I don't know for sure if they wore this uniform during that conflict. In any case, FFL troopers are always interesting, regardless of the time period. From what I have seen, the FFL figures were released in both green and khaki uniforms.
Starlux French Foreign Legion - Part II
Here is one more guy who appears to be from the same set, or at lest the same scale, about 50mm. He looks like he might have been throwing or holding something, but unfortunately it broke off. Given the fact that he came with a green base, I later realized, he was probably not meant to be set in the North African desert... well, he might have to adjust a bit.
Starlux French Foreign Legion - Part III
I am actually not sure if these guys are FFL. They are wearing similar headgear, but I think officers in the regular army might have also worn these. Perhaps one of our readers knows better?
One thing to note is that the man on the right has the tip of his baton (or flag pole?) broken off.
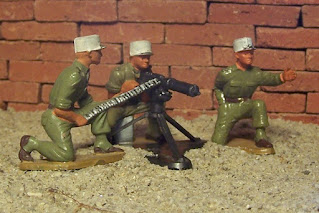
Starlux French Foreign Legion - Part IV
These guys are slightly larger than the previous one. Perhaps somewhere between 54 mm and 60 mm. I really like this set in particular. The MG can be disassembled and rotates freely around the vertical axis. I don't know if the man signaling was originally part of the crew, but he comes in handy.
Starlux French Foreign Legion - Part V
Here are several more poses with quite a bit of variety. Definitely good to have some of those special poses which are less common, such as a flame thrower or a radio man. In addition to them, we also have a decent officer, a grenade man and a funny looking guy running with a sub mg. I say that because we all know that when running we move opposite arms and legs at one time, unlike this guy.
Starlux French Foreign Legion - Part VI
And a few more guys. The guy on the right, obviously was not part of this set given the color of his base, but I grouped him with them based on size. I still don't get it why Starlux made so many different sets. With all the poses across different sets and scales, they could have made very comprehensive contributions in fewer areas. Anyhow, the most interesting guy in this picture is probably the mine sweeper.
Starlux French Foreign Legion - Part VII
And here we have two mounted officers. One seems to e leading his troops into battle, which I doubt would have actually happened on horse, and the second one is more of a spectator. Both are nice and interesting, as horses by themselves lift figures to a different level. Again, the bases don't fit the desert setting, but I'd like to keep these guys with the rest of the FFL figures that I have, who have tan bases and would fit well in North Africa.
Starlux French Red Berets - Part I
I believe these red berets represent Paratroopers, so in that sense, they very likely they represent post WWII troops, as to my knowledge, the first French para units were created in the mid 50's The poses are a mix of fighting guys and parade poses. I am certainly biased towards the fighting guys. The only one I find a bit odd is the man with the rifle above his head. More than fighting, it looks like he is cheering or beginning to surrender.

Starlux French Red Berets - Part II
Two more parade poses to go with the two other guys on the right of the prior picture.

Starlux French Red Berets - Part II
Two more parade poses to go with the two other guys on the right of the prior picture.
Starlux French Red Berets - Part III
These guys are slightly larger than the ones in the previous picture. Somewhere in between 54mm and 60mm. The man on the left is operating a flamethrower, although it's not so easy to tell that from the picture. The man on the right is an officer, but he is missing his left hand and I don't really know what he was originally holding.
Starlux French Red Berets - Part IV
A grenade thrower in a style very similar to the two previous figures, but with enough differences that it makes me wonder if it was part of a different set.
Starlux French Red Berets - Part V
These guys are about 50mm in height. Unfortunately two of them are pretty battered. The one on the left is my favorite one. Not because he is still whole, but I like the pose. It's one that could lead him to engage the enemy at any moment. There's a bit of tension in it. The man aiming is very traditional and the one with his arms raised can't be doing something very useful.
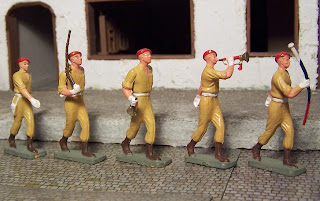
Starlux French Red Berets - Part VI
Here are some other red berets in parade poses. I don't know if the tan uniforms represent a different service branch or just another outfit worn by the French Paras.
Timpo French Foreign Legion - Part 1
A set with very few poses. The poses are actually fairly acceptable, although in terms of detail, the faces are not the best. They seem to have been sculpted by the same hand that made the B8A figures. Not sure what period they were meant to represent, but I like the fact that they have equipment which could pass for WWII era, including the white kepi. WWII legionnaires fought in the deserts of North Africa and the Middle East. They even fought on opposite sides in the Syrian campaign of 1941.
A set with very few poses. The poses are actually fairly acceptable, although in terms of detail, the faces are not the best. They seem to have been sculpted by the same hand that made the B8A figures. Not sure what period they were meant to represent, but I like the fact that they have equipment which could pass for WWII era, including the white kepi. WWII legionnaires fought in the deserts of North Africa and the Middle East. They even fought on opposite sides in the Syrian campaign of 1941.
Timpo French Foreign Legion - Part 2
This is a vintage figure. Apparently they came factory painted and you can still see traces of the original colors on this figure. Unfortunately this legionnaire seems to have lost his rifle, but he is still ready to throw a grenade.
Unknown French Foreign Legionnaire
This is another one of those guys who came in a mixed set of figures and you are lucky to run into. He is a bit banged up as you can see by the broken rifle, but even then, has managed to keep most of the factory paint. Unfortunately, there are no indications about who was its manufacturer, so if you happen to know, please leave a comment.
Crescent WWI British Infantry
This guy is a British WWI figure, but I think that given the puttees, he might pass acceptably enough for a French WWII trooper. The helmet is different but some French guys actually wore British helmets, so I just need to find a few more of his comrades and they will form up a French unit in my army.
Crescent WWI British Infantry - Part II
Here is another guy from the British WWI set. He has more of the original paint on him, although the tip of his bayonet is broken off. If it were not for the gear on his chest, I think he could easily pass for a WWII French Infantry soldier.
Finally, sometime in the future there is also supposed to be a Pegasus Hobbies French Infantry set , representing 1940 French Army figures. They released this set in 1/72 scale over a year ago. A few months back I emailed Pegasus Hobbies asking about the possibility of a 1/32 release and they expressed that there was a good chance that it might happen, so keep your fingers crossed so that we might have some nice additions to the ranks of the French. Pictures of the figures in 1/72 look really good, so I am really looking forward to them!
Click here to see a post on the Gurkhas, who fought next to the Free French at Monte Cassino.

